Wednesday, August 31, 2011

Burtons Grill Review

Went to have my birthday dinner there last night with Robbie and I broke two of my rules:
  1. Never eat in a mall restaurant, and,
  2. And never eat in a chain unless you are in a strange country and you need Pepsi with ice and a hamburger.
Burtons Grill was both so I didn't know what to expect!  They moved into the new Nordstrom wing at my local mall and I have no complaints. 

The decor was contemporary with almost every table being a booth or a banquette.  Very high ceilings, long drapes.  It was a pretty good sized place, but very intimate.  The bar was good sized with tables.  By the time we left on a Tuesday night, every seat around the bar was full.  Some eating, some drinking, some both.  My only recommendation would be to somehow close the view to the mall while you are dining...but that's just one of my things. ;) Could have been in a Back Bay or Fenway restuarant.

Menu was really good.  They have three of them; a main menu, a veggie menu and a gluten free menu.  Visit their website for details.

We started with the Philly Cheese Steak Egg Rolls.  Awesome! Served with very thinly sliced deep fried onion rings.  For dinner I ordered the Rib Eye, medium rare.  It came to the table perfectly cooked and well marbled with fat.  There was some type of compound butter on top but I forget what that was.  The french fries were heavily spiced and peppered.  Very good.

Robbie had the Lobster and Shrimp Fettucine.  He said it was awesome and there were plenty of leftovers. 

Our server was great!  She was never far away and always watching to see if we needed something. Didn't interupt with leaving new service pieces or removing service plates.

Definately on our list to repeat!  Pricing was city pricing, but the food prep, service and decor well worth the splurge.

Yes, they are a chain, about 8 so from NH to VA.  I think they all have menus that cater a little more to the local crowd.  Great idea.

Well worth visiting.

"Happy Eating!"

Wednesday, August 24, 2011

Pickled Cherry Tomatoes

Between what we are aloted at the CSA to the two cherry tomato plants, we've had an abundance.  Here's a simple recipe to enjoy.  I'll post a note when we actually get into them.

Yield, about four pints

2 quarts of cherry tomatoes
1 teaspoon kosher salt
1c white wine vinegar
1c white vinegar
1 quart water
Garlic and fresh rosemary sprigs for each jar

Wash the tomatoes and with a pin prick each one to help prevent the skin from cracking.  (Worked pretty well for me. Only a few split cherries).

Put all but garlic and rosemary in a saucepan and bring to a boil. Lower heat and boil for 10 minutes.

Pack tomatoes into hot jars into which you've placed a clove of garlic and a sprig (about3-4") of rosemary.  I found the best method for filling was to put a few in at a time and shake the hot jar to make them settle in better. 

Ladle in hot liquid. Leave 1/2" headspace.  Remove any air...I use a bamboo skewer.  Add more liquid as needed.  Adjust two piece caps.

Process in 180 degree water bath for 10 minutes.


I can't wait to try in a few months!

Happy Eating!

Tuesday, August 23, 2011

New Girls Starting to Lay Eggs!

I just walked into the chicken coop to change water and give them some "crack" and saw the sights below.  The new girls are starting to lay eggs!  That's the Dominique hen on the box and a couple of strange new eggs in a new location!  Perfect timing!


Yea!

Happy Eating!

Monday, August 22, 2011

Upper Crust Pizza


We had some of the best pizza last night.  "Upper Crust Pizzeteria" recently opened in the next town and they deliver!  There are a few locations located in Boston and close suburbs, we're about 45 minutes from Boston on a good day, so this is a treat.

The pizza was very thin crust and "crusty".  A lot like Pizzeria Regina altho not slightly burnt.  We had a steak and gorganzola pizza.  Made great leftovers today.

Pizza might be great, but the owner is a jerk to his employees...many of them from Central and South America.  He's always one step aheard of Division of Employment in Mass.  But it's really good pizza.


Happy Eating!

Ribeye and Panzenella


Nothing better than a Rib Eye steak medium rare.  Along side is my version of Panzenella.  Pretty basic.

Chop up what tomatoes you have...particularly ones that are very soft.  Add a smashed clove of garlic that you'll pick out before serving.  Add 1/2 red onion thinly sliced.  Add about 1/2 cup or less of olive oil.

I went out into the herb garden and just picked what looked good.  Parsley, chives and oregano.  Chop finely and add to bowl.  Mix well and allow to sit for at least an hour.

If you have stale bread all the better, but if not tear up a french loaf and lightly brown under the broiler.  I had stale bread and did not toast.

When ready to serve, cut up some cucumber add to bowl.  Salt and Pepper to taste and add bread.  Coat with the juices and serve at once.

You can scale this from a dinner for one to a neighborhood block party.

Happy Eating!

Friday, August 19, 2011

Skillet Corn

This was SO delish and SO easy. Even Robbie liked this one. We made in a small copper pan using six small ears of corn. I think you could scale this up and down as needed. I used pretty much the same proportions of the other ingredients.

From the Lindentree Farm CSA newsletter.
From the Boston Public Market Weekly Newsletter
Courtesy of Chef Christian Nolan

A simple preparation of pure corn goodness. Try
it straight or punch it up with spices.

2 tablespoons vegetable oil (not olive)
8 ears of shucked corn
1 teaspoon kosher salt (1/2 teaspoon table salt)
2 tablespoons heavy cream
1/4 cup all-purpose flour

(optional - 1/2 teaspoon or more to taste of chili
powder, smoked paprika, Old Bay seasoning)

Pour 2 tablespoons oil into 9-10 inch oven-proof
skillet (cast iron is ideal). Place skillet in oven
and preheat oven to 425 degrees.

Cut the kernels off cobs into a large bowl (pick
out any remaining corn silk). Add remaining
ingredients and stir together.

After the skillet has been in the oven for 20-30
minutes remove (CAREFULLY, IT'S HOT) and
pour the corn mixture into the oiled skillet. Press
down evenly with spatula. Return to oven for 40
minutes. (Keep an eye on it – timing will depend
on how big your ears of corn are.)

Remove when the top is golden brown. Allow to
sit for 5 minutes. Run a knife around the edge of
the skillet. Cover the skillet with a cutting board
or large serving platter. Invert. Give the skillet a
hard rap with something solid. If all goes well, a
golden disk of corn will have slipped right out.

Can serve 3-8 depending on how much your
guests like corn. I never seem to have leftovers


It really was easy and there were no leftovers at my house last night.

Happy Eating!

Cherry Tomatoes Two Ways.

Back from vacation.  Had a great time at Robbie's mom's house in the CT river valley in MA.

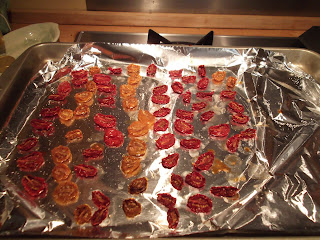
We have been inundated with cherry tomatoes from the CSA and from the yard.  Here are my ideas for roasted cherry tomatoes and then oven dried.  Also a suggestion for each in a recipe.  I was a little disappointed the oven dried tomatoes took so long.

Roasted Cherry Tomatoes

Preheat oven to 375 degrees

A couple of quarts, or what you have of cherry tomatoes that have been rinsed and dried
Salt
Olive Oil

On a cookie sheet lined with aluminum foil spread out the tomatoes.  Sprinkle with olive oil and salt.  Gently mix with your hands until coated.

Put in oven for at least 45minutes.  Check and additional time as needed until nice and wrinkled.  I didn't go for a brown state.  They are so sweet.

When cool, remove from tray to an air tight container.  Top with olive oil.

Recipe idea:  Use these for a macaroni or spaghetti sauce with some fresh basil, more olive oil and Parmesan cheese.  Last night I heated some up and topped a pork chop with.

Oven Dried Tomatoes

Preheat oven to 200 degrees

Ingredients:
As many cherry tomatoes you want to dry.

Line baking sheet with aluminum foil.  Half the cherry tomatoes and line up on the baking sheet.


I just put them in the oven, closed the door and checked on them every hour or so.  Here's the result.


They are incredibly sweet.  I'm going to top salads with them.  Just disappointed it took so long...:(


Wednesday, August 17, 2011

Just back from vacation.

Post to resume soon.  Just back from a stay in the CT river valley.  Beautiful farms and fresh air! 

Wednesday, August 10, 2011

Blueberry Clouds

Real simple.  Had some heavy cream in the fridge when I friend brought me tons of Maine 'wild' blueberries...yummmm.

A cup or so of heavy cream.  Beat it until it's very stiff.  Add a cap full of the best Vanilla extract you can find and a big pinch or two of sugar.  Add them near the end and mix to combine.

Fold in a handful or more of blueberries.

Scoop into a container and sprinkle a few more blues on top.


So rich, you don't need much and when you chew the blues, they burst in your mouth.

Happy Eating!

Monday, August 8, 2011

Freezing Veggies.

Hi,

Being members of the "farm" we get tons of veggies some weeks.  Last Thursday it was almost two quarts of aging green beans.  Way more green beans than I want to eat in a week so I decided to freeze some.  Below is my method and some pics to help get the process across.

Steps

Get a pot big enough to amply hold the veg.  Fill with water, salt generously and heat on high until boiling.  Set up a large bowl with ice and water for dumping the green beans in after cooking to stop the cooking process.

Rinse green beans well and drain.

I pinch the end off where the bean attaches to the vine.

When the water is boiling hard, drop the beans into the water.  Set a timer for two minutes.
You want to get them back to the boil as quickly as possible.

When the beans are finished, drain and immediately plunge into the ice water to stop the cooking process.


Once cold, spread them out on a cookie sheet.  Try to make sure that none are touching.


Get them in the freeze.  When solid, take out and place in a freezer bag pushing out as much of the air as possible.  Air is the enemy of frozen food.  This way you can take out a few for a salad or all for a dinner side.


Also date the bag.  It will be a wonderful treat in December when those tasteless beans from South America appear in the market.

Happy Eating!


Saturday, August 6, 2011

Cucumber Soup

This recipe was super easy...I didn't need any water to thin out at the end.  I guess my cukes had a higher moisture content.  Also added some garlicy croutons and snipped chives on top.

http://www.foodnetwork.com/recipes/chilled-creamy-cucumber-soup-recipe2/index.html

Appetizer Idea

Beet and Goat Cheese Nibbles

From this year's crop at the CSA we belong to, we've been getting beautiful beets. I used them as an appetizer last night and they were a hit.

This would make about 18 little nibbles.

1 large or two small beets.  I had yellow beets.  Cut large into two and steam in a double boiler for 20-30 minutes or until you can easily pierce with a knife.  Cool and then peel.
Goat cheese

I sliced and then cubed the beets and used the goat cheese as a filling.  Skewered.  Chilled before serving and sprinkled with fresh chives.  It could be any fresh herb really.

They were delish!

Happy Eating!

Latest cookbook addition

I'm a little behind on posting....

This is my latest cookbook addition.  Probably the last type of book I buy in hardcopy.  Just love to flip through and tag what I really find yummy.

"Around My French Kitchen" by Dorie Greenspan.

Well, some of the recipes are great favorites...I find her commentary to be a little uppity.  I had not heard about her before purchasing this book, but the cover claims she's a James Beard recipient.  It didn't elaborate.

"Mastering the Art" is still my favorite and the first cookbook I bought with my own money.  I've had my copy since high school.  And the book looks the worse for wear having traveled form apartment to house to house.


I'm still waiting for a copy of Andrew Boredain's "Les Halles" cookbook.  Oh, I didn't mention that I think I'm going French this fall.  Stay tuned.

Happy Eating.

Thursday, August 4, 2011

Ground Turkey Recall

One of the Cargill brands of ground turkey "Shadybrook Farms" was sold at Stop & Shop. 

Monday, August 1, 2011

Mussels and Corn on the Cob.

Robbie at a business event tonight, so I can have some of my favorites...which he can't look at.  This mussel recipe and then Corn on the Cob with lots of butter!

http://www.foodnetwork.com/recipes/ina-garten/mussels-in-white-wine-recipe/index.html


Yum.  Found some crusty bread to sop up the brodo.  So delish!

Latest aquisition...

The first of two new cookbooks on the way from Amazon.  I've decided I'm going 'French' this fall and winter.

I bought my first cookbook in high school from my mom's Doubleday book club.  "Mastering the Art of French Cooking", of course.  I'm adding a couple more contemporary views on French cooking.


I also have Anthony Bourdain's "Les Halles" cookbook on order.

Blueberry Jam

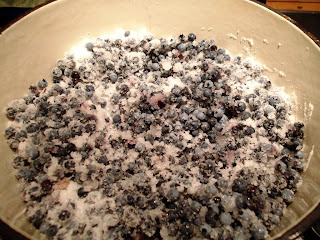
My friend Mary and her husband John were headed for Maine last week and asked if they could bring back some of the wild Maine blueberries....I got two quarts.  One and a half quarts went into this recipe.  I also decided not to use pectin, but to bring the temperature high enough so the batch will gel on its own.

Before starting the jam recipe, start the boiling water in the canner for the sterilization of the jars. This takes much longer than the jam.  Wash jars in hot soapy water rinse and place into the canner before the boil.  It's much easier to get them in early.  Boil jars for 10 minutes.  Leave inside until needed.

Yield:  About 5 - 8oz jelly jars

6c Maine Blueberries
4c Sugar
Candy Thermometer

Put into a pan that has about double of the capacity of the sugar and blueberries.  This is to prevent a spill over when you raise the heat.  I like to combine the sugar and berries before turning on the heat.

Heat on med-low and stir until all sugar is dissolved.  Then turn up the heat and bring the jam up to 220 degrees.  It takes longer than you think. 

After reaching 220 remove from heat.  You can start filling the 8oz jars that are in the hot water.  When I working alone I take out one jar at a time.  Fill with 1/4" headspace, wipe the rim, put on lid and screw on band. 
Sorry it's blurry.

<<I tried this method for processing the jars.  My friend said that until the 70's everyone did this.  Using a cloth tile turn the jar upside down and leave it that way for at least 5 minutes or more.  I did and three of the five created a vacuum, two did not...I think I might not have waited long enough so I conventionally proceed>>>

If using hot water bath to process.  Have the temp at 180 and process for 15 minutes.

Happy Eating!